Showing posts with label baking. Show all posts

Sunday, August 19, 2012

Recipe #2: S'mores inspired pie

I came up with the idea for this recipe several months ago, and went so far as to purchase the marshmallows back in June, which of course means now they are sitting on my shelf taking up space. So today I used them! Or at least part of the bag. I may have to entertain myself several times over the next few months by putting the remainder in the microwave one by one.

So, here's the idea - I love s'mores, but I haven't been camping in years, and I don't believe you can get the same taste without toasted marshmallows. So using components from other recipes and my own imagination, I created a s'mores inspired pie. I hope you enjoy, and please feel free to mess around with the recipe - this is my first attempt at putting together my own baking concept (just let me know if you do, I'd love to hear additional ideas about this).

As usual, step-by-step pictures are below, and a shortened recipe is at the end.

Preheat oven to 350F. First step - if you don't have any graham cracker crumbs, make some. I go old-fashioned and use a rolling pin and a plastic bag (be sure to get out as much air as possible before sealing).

Start with this, and after some rolling and pounding...

you should get something like this!
Add in melted butter and sugar, mix until butter is evenly dispersed.

Action shot!
It will still be crumbly, but should appear damp from the butter.
 Set aside around 1/4 cup of the mixture. Press the remainder into a greased 9-inch pie pan. Bake for 8 minutes at 350F. Remove crust and turn oven down to 325F.

You can, of course, start with either a pre-made crust or graham cracker crumbs. I like making the crust fresh - and I use the arm workout of crushing the crackers as justification for eating more pie at the end.

While crust is in the oven (don't forget about it!), mix together melted butter, sugar, eggs, and vanilla. Whisk until well-mixed, then add cocoa and flour. Mix until smooth, pour into partially-baked crust. I used this recipe as my inspiration for the filling.

Butter, eggs, sugar, vanilla, and cocoa. How could it not taste good?
Almost there!

In the crust, before returning to the oven.
Place pie in oven for 20 minutes at 325F. Take out - center will be jiggly still.
This is after 30 minutes - as outlined above and in the actual recipe, I recommend reducing the initial baking time to 20 minutes. Unless you really, really don't want a gooey center.
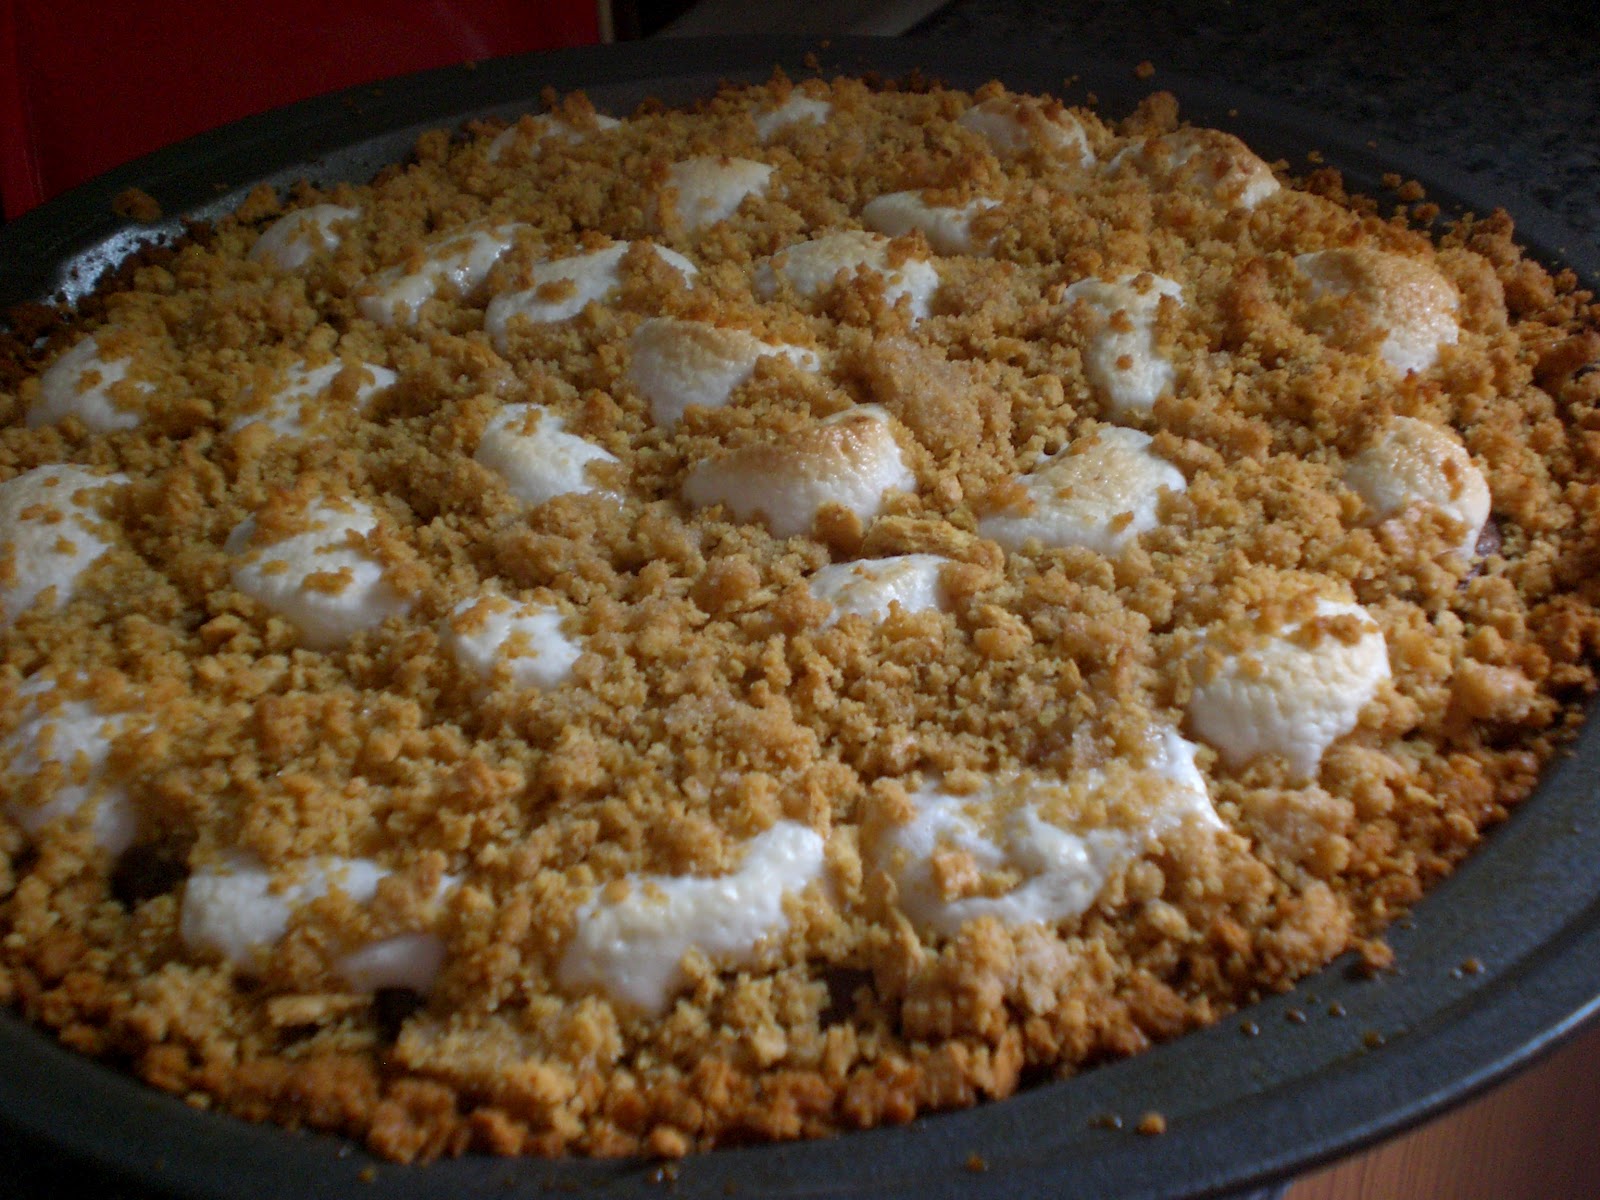
 Top pie with marshmallows and remaining graham cracker crust, return to the oven for 10 minutes.

Add more marshmallows than this. Please. This is the voice of experience talking. If I had mini marshmallows, you wouldn't be able to see the surface of the chocolate underneath.
In the oven for (almost!) the last time.
 At this point, the marshmallows should be gooey. If you want them lightly browned and better toasted (I did), you can turn the oven up to broil and stick it back in for a SHORT period of time - I got browning within 2-3 minutes.

Done!
 Slice and enjoy. It will be crumbly and the marshmallows will be sticky, but trust me, it's worth it.

Sample slice!

Verdict: As I mentioned, I would change two things about the way I did it. I would add WAY more marshmallows (they shrink while baking, so add more than you think you will need to compensate), and I would also do the initial baking for 20 minutes, so that the pie is baked for a total of 30 minutes and the center is ultra-gooey - think half-baked brownies. However, if you are not a fan of gooey half-done brownies, you can increase the initial baking of the chocolate center to 30 minutes and then add the marshmallows for an additional 10 minutes at the end.

Recipe:

For crust: 
1 package graham crackers (about 1 2/3 cup crushed)
5 tablespoons melted butter
3 tablespoons sugar

For filling (inspired by this fudge pie):
1/2 cup (1 stick) melted butter
3/4 cup sugar
2 eggs
1 tsp vanilla
1/4 cup all purpose flour
1/4 cup unsweetened cocoa

Preheat oven to 350F. Mix together graham cracker crumbs, butter, and sugar. Set aside around 1/4-1/3 cup. Use the remaining to press into a 9-inch pie pan. Bake for 7-9 minutes at 350 degrees, until the crust just starts to brown. Remove from oven and turn temperature down to 325. 

For filling: Beat eggs with butter and sugar. Add in vanilla, mix well. Add cocoa and flour, mix until smooth. Pour into crust and bake at 325 for 20 minutes. Remove pie from oven (top will be soft still) and add marshmallows on top, pressing lightly. Sprinkle the remainder of the graham cracker mixture over the top and return to oven for 8-10 minutes. If desired, turn oven to broil and return pie to oven for a final time - watch closely! Remove when marshmallows start to turn a light brown.


Saturday, August 18, 2012

Recipe #1: Cardamom shortbread

This was the sunset this evening, as taken from the roof of my building. It's not related to anything in this post, I just thought it was beautiful
I'm beginning my weekend cooking a bit late (9 pm on a Saturday isn't late, right? Lots of people stay out until the wee hours. I just cook until the wee hours). I was a little overwhelmed at all the options and still haven't decided on a savory meal. So instead, I'm turning to my usual procrastination method and baking some sweets.

I'm not sure where I initially found the recipe, but I love cardamom, so it was perfect: Cardamom shortbread! As a bonus - err, justification - it uses up the rest of my rolled oats.

Ingredients:


Only 6 ingredients! I added some nutmeg to make it seven, but overall, super simple.
It sounded straightforward, simple, and tasty - just what I need to get back into baking (I haven't really done any since my return from Zurich in mid-July). Pictures below, actual recipe at the end.

First, cream the butter and sugar together well, then add oats and vanilla.

Creamed mixture plus oats. I forgot to take a picture of just the butter and sugar, I got wrapped up catching up on the first season of Grimm (a poor not-really substitute for Buffy, but I do enjoy the wise-cracking werewolf-like sidekick).
An empty can! Am I the only one excited about this? (yes, probably). I can't guarantee there won't be more pictures of empty things as I use items up.
Add in flour, cardamom, and any other spices you might enjoy (I added some nutmeg), mix until it all comes together. Press mixture into a very, super well-greased 9-inch cake pan.

All pressed and ready to go! I would recommend tamping down around the edges a bit more than this.
 Bake in a 350F oven for around 25 minutes (I did closer to 30, but I'm fairly convinced that my oven thinks that 320 is the new 350). Let it cool in the pan for 10 minutes (important!).

Out of the oven and smelling divine.
 Carefully loosen the edges with a knife (this is made easier if the edges don't stick up very much, hence my advice to tamp them down well) and turn shortbread out onto a cutting board. Cut while still warm - hypothetically into wedges, but you can get creative. Allow to cool entirely before storing away into an airtight container.

I didn't wait an entire 10 minutes before the cutting board, so I had one piece that broke off. I then had to get creative with my wedges. Luckily, it doesn't have to be pretty to taste good.
Verdict: As might be expected with this much cardamom and so little flour, the flavor is strong - almost too much in some bites. However, I love cardamom and thought overall it was delicious - not too sweet, the texture was spot on for shortbread, and would taste absolutely divine with a lovely cup of chai or other black tea. I added in the dash of nutmeg to the recipe, and next time I would vary the spices more, but probably keep the overall amount (1 tsp total) the same. And I would definitely make it a next time!

Shortened recipe:

Ingredients:
1/2 cup (1 stick) butter, softened
1/4 cup sugar
1 tsp vanilla
1 cup rolled oats
1 tsp ground cardamom
2/3 cup flour
dash of nutmeg

Cream together butter and sugar. Add vanilla and oats, mix in. Add cardamom, nutmeg, and flour, mix until a dough forms. Press dough into very well-greased 9-inch cake pan and bake in a 350F oven for 25-30 minutes. Remove from oven, let cool in pan for 10 minutes. Carefully loosen edges with a knife and tap out shortbread onto a cutting board. Cut into wedges while still warm, let cool completely. Enjoy!


Monday, June 4, 2012

Herb cheese bread recipe

As promised, here is the recipe for the cheese bread - with step-by-step pictures! I adapted the recipe from this website - my version is a bit simpler (and has dill, which makes everything yummier). When I first returned to baking a few months ago, I was quite nervous about the details and time commitment of making yeast-based breads. However, I've learned that they can be quite simple and  are definitely worth the time. Also, yeast can survive quite a range of warm water, so don't worry too much about that - just don't kill it with boiling hot water (my tip: it should feel warm, but shouldn't be painful to stick your finger in).

Unfortunately my herbs are not in useable shape right now - the rosemary, thyme, and sage all need to grow back from being used several weeks ago (and haven't had the chance due to all the rain), while the basil plants aren't large enough to cut leaves yet. I don't have any dried sage, but if I did, I would've thrown some in as well. I encourage you to experiment with different herbs (and cheeses).

Without further ado, here we go!

You will need:
1 package active yeast (not instant. if you don't have packages - I buy yeast in larger containers, 1 package = 2 and 1/4 teaspoons)
1/4 c + 1 cup warm water (I have a candy thermometer, so I always make sure that it's between 100-120F or 40-48C. If you don't have a thermometer, see above comments)
1 tsp + 1 tsp sugar (what do I mean when I write this? I mean you will be using them at different times, so they should be separated)
3 and 1/4 c flour, plus extra for the surface while kneading and rolling out
2 teaspoons salt
1/2 teaspoon black pepper
2 tablespoons olive oil
1 cup grated cheddar cheese
Cooking spray (or a bit more olive oil)
Herbs - I use heaping amounts of the following (remember these are all dried. 1 teaspoon dried is approximately 1 tablespoon fresh)
1 teaspoon dill
1/2 teaspoon oregano
1/2 teaspoon basil
1 teaspoon rosemary
1/2 teaspoon thyme

All the ingredients assembled! When I bake or cook, I like to get out everything ahead of time, and then put each item away as I use it. It allows me to go from most -> least clutter (just don't forget to leave things out you use multiple times, like the flour!)
You'll also need the following materials:
1 glass (measuring cup or drinking, doesn't matter)
2 good-sized mixing bowls
plastic wrap (or a towel)
surface for kneading/rolling out
1 loaf pan

First, mix together the yeast with 1/4 c warm water and 1 tsp sugar in the glass. Let sit while measuring out the next step - it should be foamy within minutes.

Foamy and fun! I don't own any glass measuring cups, so I just use a small drinking glass instead.
Mix the flour with the remaining sugar, salt, pepper, all herbs, and cheese.

Add the foaming yeast to the flour mixture, along with the remaining cup of warm water and the olive oil. Mix as best you can, but I usually only give it a few stirs, the minimal to let it clump and come together, before turning it out to knead. (Note: if you are new to making doughs that you knead, resist the urge to add more liquid even if you feel the dough isn't coming together. It will eventually - it's not like cookie or cake batters that quickly absorb the flour).

The dough right before I turned it out for kneading. It doesn't have to be pretty, just minimally glomming together (it's a technical term). I used white cheddar, so the cheese is hard to see.
Knead the dough on a well floured surface, adding more flour if necessary, until it is soft and smooth - time on this will vary widely, depending on how quickly you knead. The original recipe says 10 minutes, but I found this to be much longer than necessary.

Gather the dough into a rather tight ball. Grease a clean bowl with cooking spray or olive oil on a paper towel (this is important, otherwise the dough will NOT come out). Place the dough in the bowl, making sure to turn it over at least once to coat the entire ball in oil/spray. Cover the bowl tightly with plastic wrap and let it sit somewhere away from cold drafts.

On the stove for its first rise in a clean, greased bowl.
I like to put the bowl on top of my gas oven, which is lovely and toasty warm with its little pilot flames under the top, perfect for the yeast. This allows the dough to double in size quite quickly - usually about 45 minutes. If it's just on the counter, you'll probably want to wait longer - an hour to hour and a half (use this time to bake more items! My favorite is to make cookies while I'm waiting on my yeast breads). Also - no plastic wrap? no problem. Just put a cloth towel over the dough to keep it from drying out while it rises.

After the first rise. Be gentle with it at this point - you don't want to lose all the air bubbles the yeast just created.
When the dough is ready, carefully turn it back out onto the floured surface. It may be sticky, so be ready with more flour. You don't want to punch it down completely or treat it harshly at this point and undo all the air bubbles the yeast has worked so hard to put in.

Roll it out into a rectangular shape, with the short side the length of your loaf pan (mine was 8 inches long, but it's an approximate thing) - I just use my hands to pat the dough out gently, as it's easier on the dough than using an actual rolling pin. Grease the loaf pan. Starting with the short side of the dough, roll it up and carefully tuck the ends in before placing it in the pan.

Patted out - you can still see lots of air bubbles throughout the dough, and it's not a perfect rectangle. That is all ok.

Rolled up and ready to be put in the pan. Be sure to put the seam side down when you move it to the pan.

Cover with the plastic wrap (loosely this time - it needs the space to rise) and return to its warm place to let rise for another 30-60 minutes.

Ready for the second rise! Back on top of the stove it goes - it will rise very fast this time, since I preheat the oven during this time, and it gets quite toasty.
During this time, preheat the oven to 400F (200C, I think). When the dough has risen enough (see picture), put the bread in the oven and bake for 30 minutes.

Ready to go in the oven! Don't forget to take off the plastic wrap - that would be bad.
 Enjoy the aroma. The bread will be a light brown - you can tell it's done if it sounds hollow when you tap it (be careful with your knuckles if you try this approach, as it will be quite hot!).

Done! You can now see the cheese throughout the loaf.
If the pan was well-greased, the bread should come out easily from the pan. Let it cool on a rack (if you have the patience), then enjoy! As I said in my previous post, one of the reasons I love this bread is because it has so much flavor it doesn't necessarily need any dressing up, but it has enough heartiness to make an excellent sandwich bread.

I didn't have much patience, and I also wanted to try out my brand new bread knife - the old one mutilated loaves because it was so dull, so I splurged on a new one. It was like going from Peewee football to the NFL.

If anybody out there actually tries this, PLEASE leave me a message and let me know! I'd love to hear how it turned out, and especially any changes you made to it. I can't wait to try it with fresh herbs.

Monday, May 7, 2012

Running out of Thyme

I made a "tart" this weekend. It's in quotes because I'm not sure what it ended up being (other than tasty!). I started out following this recipe. I made it to the putting the dough in the refrigerator step and then wandered off on my own idea. The onions smelled heavenly while caramelizing (the key is to put them over a very low heat so that they don't burn, which was a bit challenging on my gas stove). I used some thyme and rosemary from the window for flavoring. Unfortunately, my thyme plant is being used up faster than it is growing, so I won't be using any more for a few weeks to give it a chance to recover. I threw in some pancetta about halfway through the caramelization.

When first added to the pan. The onions barely fit, and I could barely see them through my tears. Anyone have tips on how to avoid waterworks during cutting them?

About halfway through, when I added the pancetta and the herbs. Starting to cook down and look delicious.

About 35 minutes later. The onions were soft and sweet, and my entire apartment smelled like heaven.
I was disappointed to see that the cream/egg in the recipe was just for the crust, so I found this recipe and used it as inspiration for a spread. In my mind, the tart would be something akin to a tarte flambee - a delicious Alsatian dish that I fell in love with when I lived in Strasbourg years ago. I ended up using about 4 oz of goat cheese, 2 tablespoons of sour cream, and just enough heavy cream to make it soft enough to spread easily. Yum, healthy!
I rolled out the dough (it was a bit crumbly, so it did not roll evenly), and then curled up the sides to make a sort of "crust." The goat cheese mixture spread easily and was about 1/4" thick over the dough.
I let the onions and pancetta cool some, then placed it into the crust. Overall, after baking, the tartness of the goat cheese mixed well with the sweetness of the caramelized onions and the crust was light and flaky, although it was a bit too crumbly. Changes for next time include: making more of the spread and making it more liquid so that it can mix with the onions while it cooks in the crust. Overall, though the mix of flavors worked very well, and it is now in containers for lunches this week.
Ready to pop in the oven!
Getting it out of the oven 20 minutes later was a bit challenging. The parchment paper broke and part of the tart ended up on the open oven door. I ate it anyway.
On the garden front, we had rain or overcast skies the entire past week in Boston, so unfortunately the outside plants haven't had much sun. Despite this, however, the strawberry plants continue to grow and my heirloom tomato plant has started to outgrow its pot. I may have to invest in a larger one.

The Heirloom plant. The pot seemed oversized when I first purchased it!

I thought I had lost two of the three pea plants I transplanted, but when I checked them Sunday afternoon, they may have a chance at recovery yet. The tops of them had wilted, but they each have other leaves that may allow them to grow. I'm staying optimistic!

Sorry for the blur. I'm crossing my fingers and hoping for these guys to pull through. I had no idea pea plants were so sensitive to replanting.
Haven't killed them yet! Every time I look I see more berries on these plants, but the pink one hasn't ripened any further yet. I hate waiting.

Bonus shot of the mini blueberry muffins on Sunday. I also made some delicious soft molasses cookies with icing. Sundays have become baking marathons the past few weekends, and it's been great! Although perhaps not for my (or my labmates') diets.

Monday, April 30, 2012

Weekend adventures in baking

I had an unusual amount of free time this weekend, as I only had to drop into lab briefly on Saturday morning to maintain some cells. I made an ambitious list for the apartment, the garden, although the kitchen ended up dominating my time. When I have a few hours on Sunday (and I've been successful in my grocery shopping), I like to make lunches for the week and portion them out ahead of time - a trick my sister taught me, and one that makes me much more likely to bring my lunch to lab instead of buying it (saving me money and probably healthier as well). So I made herb dijon salmon (which is totes delicious, but I can't claim credit for it - I love Trader Joe's selections of pre-marinated meats that come with clear and easy-to-follow instructions, so even a recovering semi-vegetarian like me can follow them).

Lunches for the week! It uses almost the same number of leftover dishes I would if I separated the meal parts, but so much easier to just grab and go.
To accompany, I sauteed some frozen green beans I had (also from TJ's) and decided to roast some baby potatoes as well (also from TJ's, if you notice a theme). I tossed them in around a tablespoon or so of garlic-infused olive oil (from...well, you get the idea), and then cut up and threw in some dill, thyme, rosemary, and one sage leaf from my window. The first official use of my herbs! I was overly delighted by this. The potatoes came prewashed (much appreciated!) and after some good tossing in a bowl, I simply threw them in the oven in a pan for thirty minutes at 400F. I probably should/could have roasted them for less time - for potatoes this small, twenty minutes would be plenty. But they came out smelling delicious and looking lovely. As a side dish, it couldn't get any easier - no measuring, very little cleanup, and quite fast. For larger potatoes, I would cut them into pieces, but these are the perfect size bite whole. I can't claim originality for this idea - found through supercook.com - although the dill was my idea as I thought it would accompany the salmon well. Next time, I would throw in some sea salt and pepper as well to help spice it up more.

Setting the stage - an overabundance of all things Trader Joe's. I would highly recommend the olive oil for anyone who enjoys garlic - it adds great flavor to just about anything.

Just before the oven - my, what wonderfully chopped herbs you have.
I also put my three herbs (minus the dill) to good use in a buttermilk biscuit recipe I found online. I love biscuits of any kind, so this recipe was right up my alley. I was liberal with the amount of herbs I put in, and I also tossed in a good handful of grated sharp cheddar - because how could cheese not go with this? I didn't do drop biscuits, instead rolling out the dough and cutting them with my improvised biscuit cutter (classy, I know).

Butter, pre-melting. It already smelled delicious, although I wondered why the recipe didn't just put all these herbs directly into the dough.

Sometimes you gotta make it up as you go. As long as the edge is floured well beforehand, this actually works quite well.

Smeared with butter and ready to go in the oven!

You can see the cheese now that it's baked and melted. I paid for early sampling with a burnt tongue, but it was totally worth it.
Next time I would add significantly more cheese and also put more of the herbs actually in the dough. However, the texture of the biscuits turned out beautifully and they would be wonderful with soups, stews, or eggs for breakfast. They weren't good enough for me to convert from my standard baking powder biscuit recipe (the one adapted to produce this berry shortcake), but I'm glad I tried them.

That was the end of my window garden-based cooking adventures, but I didn't stop there. Jenn, a friend whose baking I can only aspire to, gifted me a donut tray some time ago, and I was eager to try it out. I ended up trying out this recipe, with more vanilla and a dash of cardamom added (I have a slight obsession for cardamom, so I will toss in a pinch with just about any dessert I make).

First time use of the donut tray! I had no idea what to expect....

...but they turned out pretty near perfect.
The donuts fresh out of the oven reminded me of bagels, which have now gone on my list of "some day" baking. They were a wonderful, light texture but a bit tasteless pre-sugar. And after sugar - well, how could they not taste good?

Doused in butter and rolled in cinnamon sugar! I have no idea how the missing bite came about from the top donut. Must've been the dog.
 I ended my baking adventures with this recipe for what claimed to be "homemade oreos." They ended up being somewhere between a whoopie pie and the classic sandwich cookie - not a bad thing! I took the cookies out of my oven at exactly nine minutes as the recipe called for, even though my oven usually takes a few minutes longer. This left the cookies chewy (delicious - I much prefer soft cookies to crisp ones). I didn't have any vegetable shortening, so I only used butter for the filling - next time I would definitely use a lighter, fluffier filling, more akin to whoopie pies than this recipe. Overall, though, a wonderful baking weekend, and now I have lunches and sweets to spare!

Vodka + vanilla beans = cheap vanilla for baking (you can also use other alcohols). This bottle had been sitting in my room at my parents' house for years (not for drinking but as a centerpiece for the ads I used to collect), and I finally opened it up and put it to use.
The cookies just out of the oven, cooling. I was pleased that they remained soft, even the next day.
My presentation may be lacking, but they certainly tasted delicious. And quite like oreos, though strangely the individual components did not. It's a mystery.